Let’s start with what you need to prepare for setting up your interviews:
- List of the Interviewers
- List of the Assistants
- List of the Applicants
- Organize Applicants’ application.pdf and photo files in a folder
![]()
To make it easier, download (see the links below) and use these spreadsheets in csv format for importing data to your web app. You can either type the information directly in the spreadsheet or just copy and paste the information in corresponding columns.
Please:
- keep the file format in csv, do not change it, as the file will not be useful for importing the information
- make sure the information is entered correctly and in correct columns
Interviewers and Assistants spreadsheet must include: First Name | Last Name | Degree | Position | Phone | Email | Password (optional)
Applicants.csv spreadsheet must include: App.ID | First Name | Last Name | Degree | Edu_1 | Edu_2 | Phone | E-mail | Password (optional)
- App.ID: for SF Match is the Applicant ID and for ERAS please use AAMC Number
- Edu_1: highest education
- Current residency for fellowship programs
- Current medical school for residency programs
- Edu_2: (optional) second highest education
- Fellowship programs: Medical School
- Residency programs: College
Click on the links below to download and complete the files:
Go Interviewers tab,
Option 1) Upload your list
click on “Upload List” button ![]() . You can either:
. You can either:
- click on “Browse”, go to the folder on your computer that you saved interviewrs.csv file in, select the file and click “Open”
< or >
- open the folder on your computer first, then drag and drop interviewers.csv file into the box in the web browser and click “Upload”
Option 2) Single entry
Click on Add New button and enter information individually for each interviewer in the data entry form
After completing your list, click on edit button ![]() and add each Interviewer’s photo by uploading it into the box.
and add each Interviewer’s photo by uploading it into the box.
To remove an interviewer from the list click on delete button ![]()
Go to Assistants tab,
Option 1) Upload your list
Click on “Upload List” button ![]() . You can either:
. You can either:
- click on “Browse”, go to the folder on your computer that you saved assistants.csv file in, select the file and click “Open”
< or >
- open the folder on your computer first, then drag and drop interviewers.csv file into the box in the web browser and click “Upload”
Option 2) Single entry
Click on Add New button and enter information individually for each assistant in the data entry form
Go to Applicants tab,
Option 1) Upload your list
Click on “Upload List” button ![]() . You can either:
. You can either:
- click on “Browse”, go to the folder on your computer that you saved applicants.csv file in, select the file and click “Open”
or
- open the folder on your computer first, then drag and drop interviewers.csv file into the box in the web browser and click “Upload”
Option 2) Single entry
Click on Add New button ![]() and enter information individually for each applicant in the data entry form
and enter information individually for each applicant in the data entry form
After uploading the list, you will see many or all applications and photos are automatically uploaded into your web app.
To add the missing files, you can either:
- click the edit button and upload them for each applicant
or
- click on “Upload Files” then use the Photo/Documents box for uploading multiple files together
Go to Sessions tab, click on +Session to create a new session, enter session’s parameter:
- Name or Title
- Date
- Minimum Score
- Maximum Score
- Start Time
- Number of Rounds
- Interview Duration (minutes)
- Review Duration (minutes)
> Number of rounds is number of the interview room(s) each applicant will go for interview. There might be one or more interviewer in each room.
Then click on Add Sessions ![]() to created the new sessions. You can always go back and change the session’s setting by clicking on Edit.
to created the new sessions. You can always go back and change the session’s setting by clicking on Edit.
Repeat the same steps for creating additional interview sessions as you need.
Follow the instructions on next steps to complete setting up your new session(s).
For initially setting the rooms you need to go to Sessions tab, select the session (if not already selected),![]()
You need number of the interview rooms equal to or more than number of the rounds.
Click on Session Rooms button ![]() on bottom of the session’s box, and then +Add New Room.
on bottom of the session’s box, and then +Add New Room.
- Select a name for the room
- Enter Video Call Link (you can leave this for later)
- Click on Interviewer(s) box and select the interviewer(s) from drop-down menu to assign to the room
- Click on Add Room to complete
Repeat the same steps for creating additional rooms as you need.
You can always update/edit a room information by going to Rooms tab and selecting the room to edit.
Go to Sessions tab,
- Select the session (if not already selected), if you have more than one
- Click on “Manage Applicants” button
 at the bottom of the session’s box.
 - Select the applicants by clicking on the box next to their names to assign them to this sessions (to select al,l check the box in header of the column) then click on Save Changes to complete.
Go to Assignments tab,
- You will see a preliminary schedule is automatically generated based on session’s parameters, applicants and rooms
- Click on “Accept and Lock-in changes” button
 to finalize the assignments
 - Click on Show the Schedule and follow the next step to complete your schedule
In Schedule tab you can further update or complete the schedule.
- Hover the mouse pointer over the time period’s box to access the time period’s setting, a yellow box with a black gear will appear
- click on the gear sign and see the options:
![]()
To swap 2 applicants:
- click on the first applicants > swap icon

- it will turn yellow and show “From”

- it will turn yellow and show “From”
- click on the second applicant one
- it will turn green and show “To”

- it will turn green and show “To”
- click the check mark to complete
- if any of those applicants was already assigned to that room, it will turn pink meaning duplicate,
- you need to reverse the swap
You can adjust the period or insert a blank time period in the schedule
Time Track is for coordinating the busy interview day.
Detail information is provided to your Interviewers and Applicants on their accounts. Please have them log into their personal account at least a few days before the interview date and make themselves familiar with the process and steps. It will help with having an efficient and smooth interview process.
Your Assistants will help you as Moderators for video call interviews. You might want to assign one Assistant to moderate one interview room, or maybe more if she/he is expert enough.
A/ Applicant | M/ Moderator | I/ Interviewer
Interview process:
- A/ “check-in” 10 minutes before the scheduled interview time
- M/ click on A/ in a time slot > select “Call-in” to activate the video call link and allow the A/ to log in
- A/ click on the link and log into video call
- M/ when see the A/ logged in the interview room > update the status to “Waiting”
- In case the A/ does not login within a few minutes, M/ can send a direct Text message to A/ registered mobile phone# by selecting +Text on status options
- I/ when ready for the A/ to enter the room for interview > update the status to Ready
- M/ Admit A/ into the interview room and update the status to “In Progress”
- M/ repeat the same steps with calling the next A/
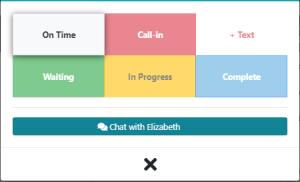
Status and Color codes:
- On Time | Black font
- Checked-in | Blue font
- Called-in | Red font
- Waiting | Green font
- Ready (room) | Green background
- In Progress | Yellow background
- Complete | Blue background
Status selection menu:
![]()
Chat options:
You and your assistants can have direct text communication with Interviewers and Applicants.
> Click on Interviewer’s name below the Room then select Chat with …
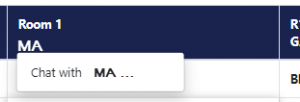
Interviewer’s picture will appear on bottom right of the screen, click on to start chatting with the Interviewer.
> Click on Applicant’s name and then on Chat with …
Applicant’s picture will appear on bottom right of the screen,

click on it to start chatting with the Applicant.
![]()
- To minimize the Chat window click on down arrow
- To close/remove a chat, select the person’s picture, click on Delete icon (trash can) and then on red Delete button to confirm

Following completion of each interview the interviewer will enter a score value, between minimum and maximum defined in session parameters.
As each score is entered by an interviewer it automatically gets uploaded to the applicant’s record and the average score is calculated in real time.

- Click on applicant’s photo to view in larger size
- Applicant’s name and highest education is displayed next to the photo
- Initially applicants are sorted alphabetically
- A blank score box has orange background
- an additional score can be entered in “Add” score box
- Avg = Calculated Average scor
- All applicants are ranked based on the Finale score
- To change the rank order you can edit the Final score
- the rank order will get automatically updated
- The Average score will remain unchanged
Score Board will show all sessions by default. If your interview has more than one session, you can select to display applicants of each session separately using the session selection drop-down menu on header of the table ![]()
All Applicants who have at least one score will show on this screen. They are initially ranked by the final score, then the last name alphabetically when two or more have equal score.
You can change the rank by clicking on the applicant’s card and moving (hold the left key) and placing it on the desired spot. Remember to click on “Update Ranks” to apply the change(s).
When ranking is complete, you can print the final list or download it into a spreadsheet using the Print ![]() and Download
and Download ![]() button on header of the table.
button on header of the table.